Windows 10 deployment scenarios and tools
Содержание:
- Скачать
- Что такое VMware Workstation Tools
- USB Compliance Devices
- Ошибки USB/DVD Download Tool
- Как создать виртуальную машину Windows 10
- Microsoft Deployment Toolkit
- USB4TM Test Tools
- Free Windows installation program
- Изменения
- Процедура создания загрузочного носителя с Windows 7
- fsutil
- Products Used for Testing
- What’s New
- Выбор подходящего носителя
- Создание точной копии флешки, с помощью USB Image Tool
Скачать
Последнее обновление 2021.08.03:
- Rufus 3.15 (1.1 МБ)
- Rufus 3.15 Переносная версия (1.1 МБ)
- Другие версии (GitHub)
- Другие версии (FossHub)
Поддерживаемые языки:
| Bahasa Indonesia | , | Bahasa Malaysia | , | Български | , | Čeština | , | Dansk | , | Deutsch | , | Ελληνικά | , |
| English | , | Español | , | Français | , | Hrvatski | , | Italiano | , | Latviešu | , | Lietuvių | , | Magyar | , | Nederlands | , | Norsk | , |
| Polski | , | Português | , | Português do Brasil | , | Русский | , | Română | , | Slovensky | , | Slovenščina | , | Srpski | , |
| Suomi | , | Svenska | , | Tiếng Việt | , | Türkçe | , | Українська | , | 简体中文 | , | 正體中文 | , | 日本語 | , | 한국어 | , | ไทย | , |
| עברית | , | العربية | , | پارسی | . |
Системные требования:
Windows 7 или более поздней версии, неважно, 32 или 64 бит. После загрузки приложение готово к использованию
Я хочу выразить мою благодарность переводчикам, которые перевели Rufus, а также эту веб-страницу на различные языки. Если вы обнаружите, что можете пользоваться Rufus на вашем родном языке, вы должны благодарить их!
Что такое VMware Workstation Tools
Чтобы одновременно запускать на одной физической машине (сервере или компьютере) несколько операционных систем, были придуманы специальные программы. Одной из таких программ является VMware Workstation Player. С её помощью можно создавать на компьютере с одной ОС, ещё один компьютер с совершенно другой ОС — виртуальную машину (ВМ или VM). VMware Workstation можно установить на macOS, Windows, а также на Linux и его дистрибутивы.
Однако, чтобы виртуальная машина работала наравне с физической, желательно установить дополнительные программы и утилиты. Например, VMware Workstation Tools.
VMware Tools — это специальный пакет программ, с помощью которого можно оптимизировать взаимодействие виртуальной машины и физической, ресурсы которой использует для работы виртуальная. Он позволяет улучшить управляемость и производительность операционной системы ВМ.
Tools усиливает интеграцию с гипервизором — элементом, который отвечает за распределение ресурсов основного компьютера между несколькими гостевыми операционными системами и изоляцию их друг от друга.
VMTools позволяет:
Тулс можно запускать на 32-разрядных и 64-разрядных операционных системах. Инструмент интеграции подойдёт для работы как на Windows, так и Linux и других дистрибутивах.
Пакет устанавливается одним из двух способов: сразу при создании гостевой ОС (через функцию Open-VM-Tools) или после её создания. Чтобы использовать первый способ, в старых версиях достаточно выбрать автоматическую интеграцию (OVT) при установке машины. В новых версиях пакет чаще всего устанавливается по умолчанию.
Во втором случае установка происходит вручную. Нужно смонтировать ISO-файл, который будет содержать двоичные файлы (установочные файлы, скрипты и другое) в виртуальный CD-ROM гостевой машины.
Ниже мы покажем, как установить Windows 10 на Workstation, а также разберём установку Tools вручную.
USB Compliance Devices
The following compliance devices are used in conjunction with compliance software to demonstrate USB hub or host compliance. These devices are not designed for use with the windows stack, and are only to be used with host and hub specific tests. Please address host or hub testing questions to usbcompliance.org.
Low Speed Compliance Device
Firmware requirements are handled through USB30CV software. This is a bus-powered device.
The Low Speed Compliance Device is available through the USB-IF here.
Full Speed Compliance Device
Firmware requirements are handled through USB30CV software. This is a bus-powered device.The Full Speed Compliance Device is available through the USB-IF here.
SuperMUTT
The Microsoft SuperMUTT operates as a Full Speed, High Speed, and SuperSpeed compliance device. XHCICV and USB3CV can programmatically change the SuperMUTT to operate at the desired speed. We recommend using the SuperMUTT instead of the older compliance devices. Use SuperMUTT firmware version 57 or later. The firmware updating utility can be downloaded here or directly from Microsoft. Additional info can be found here: https://docs.microsoft.com/en-us/windows-hardware/drivers/usbcon/muttutil. Ordering instructions are found here: https://docs.microsoft.com/en-us/windows-hardware/drivers/usbcon/microsoft-usb-test-tool—mutt—devices. Contact usbcompliance@usb.org with any questions.
Ошибки USB/DVD Download Tool
Так же я хотел бы уделить такой теме как возможные ошибки при установке образа на съемный носитель или компакт диск.
И приведу несколько самых распространенных примеров их решения.
Первая ошибка у вас может возникнуть, когда вы выбрали образ системы и перешли на следующий пункт и вдруг появляется окно с вот таким текстом «The selected file is not a valid ISO file» или на русском «Выбранный файл ISO-образа не является таковым»
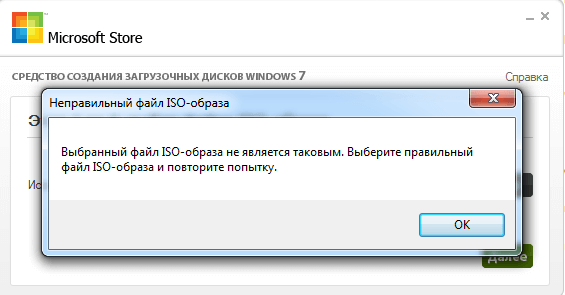
Появилась данная ошибка потому что образ операционной системы был поврежден и исправить его можно с помощью другой утилиты под названием «PowerISO»
С помощью данного софта вам необходимо разархивировать образ и с помощью той же программы пересоздать образ. С помощью данных манипуляций можно решить эту проблему, но, если образ операционной системы был не сильно поврежден, если это не помогло то вам придется скачивать другой образ.
Следующая ошибка может быть самой распространенной при записи Windows 7/8/8.1/10 64 –х разрядной версии на съемный носитель!
Прочитайте ее внимательно, и тогда у вас получится исправить ошибку. Если у вас появилась Ошибка «Files copied successfully. However, we were unable to run bootsect to make the USB device bootable. If you need assistance with bootsect. please click “Online Help” link above for more information.»
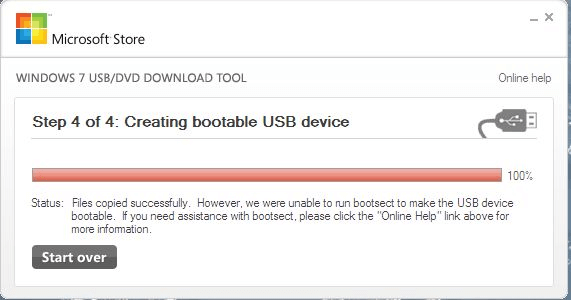
Я не буду длительно обрисовывать эту ошибку, так вот она возникает когда вы желаете записать на USB-флешку Windows 7 или Windows 8 64-х разрядный но при всем этом записываете его на Windows 7 32-х разрядном.
Для решения этой ошибки, Вам необходимо скачать на просторах интернета следующий файл: «bootsect.exe» если вы его не найдете в интернете то он точно будет в Windows 7 32-разрядной. Так вот это файл необходимо поместить по адресу «C:\Users\Имя_пользователя\AppData\Local\Apps\Windows 7 USB DVD Download Tool» при это если у вы не меняли путь при установке программы.
После того как вы поместите файл «bootsect.exe» в каталог Windows 7 USB DVD Download Tool, вы сможете без проблем записывать разные версии Windows будь то 32-х или 64-х разрядная система. После этого ваша программка станет более полезной и уникальной.
И теперь мы можем сделать вывод, что нет надобности нести компьютер в сервисный центр если можно переустановить Windows самому, и оказалось, что не так и трудно записать образ операционной системы на носитель с помощью Windows USB/DVD Download Tool, и я уверен, что после проделанной вами такой работы вас не составить труда переустановить операционную систему на компьютер, но это уже скорей это другая темы и мы ее обсудим в следующих статьях…
Как создать виртуальную машину Windows 10
-
1.
Запустите Workstation Player и нажмите Create a New Virtual Machine:
-
2.
Нажмите Browse и в локальной папке компьютера выберите ISO-образ Windows 10. После этого кликните Next.
-
3.
Кликните на строку Version of Windows to install. В выпадающем списке выберите Windows 10 Pro for Workstation и нажмите Next:
-
4.
Во всплывающем окне нажмите Yes:
-
5.
Затем кликните Next:
-
6.
Выберите максимальное количество дисковой памяти, которое сможет использовать BM, и нажмите Next:
-
7.
Чтобы завершить настройку, нажмите Finish. Создание машины займёт 5-10 минут.
Готово, установка завершена.
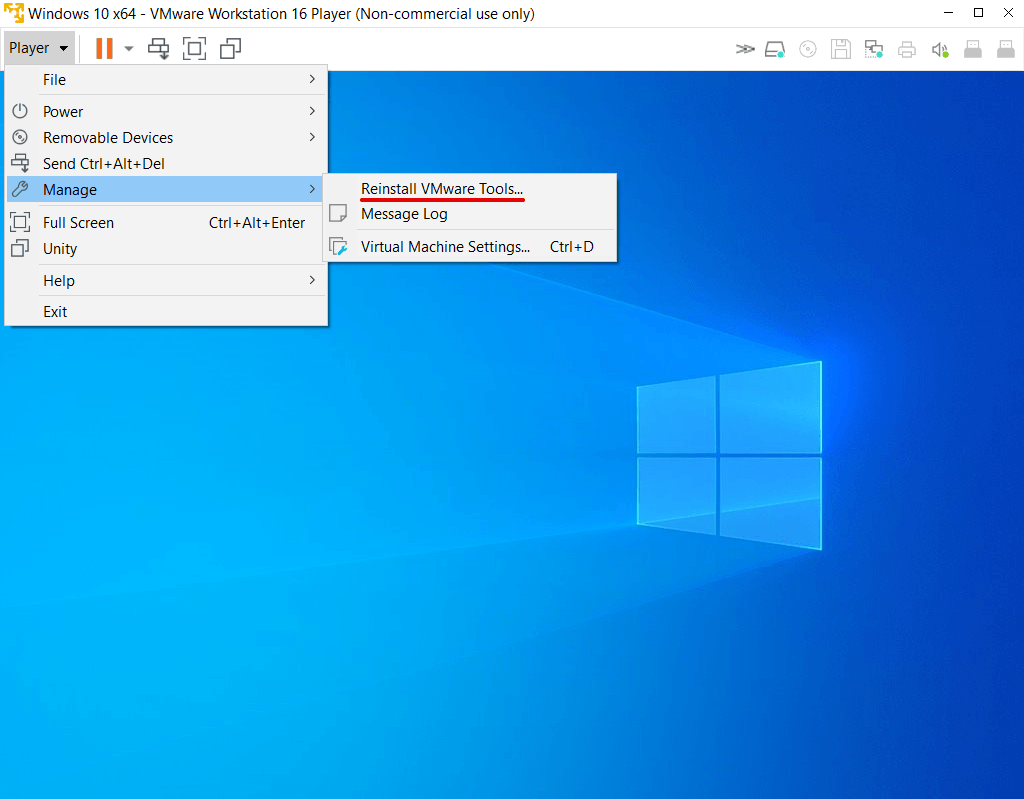
Часто пакет Тулс устанавливается автоматически при создании VM. Чтобы проверить, активирован ли Тулс, в панели управления ВМ нажмите Player:
В списке наведите курсор на раздел Manage. Если в первом пункте выпадающего списка вы увидите «Reinstall», значит пакет тулс уже установлен. Если в пункте будет указано «Installation», значит пакет нужно установить вручную .
Если кнопка Tools в настройках неактивна
-
1.
В панели управления нажмите Player и наведите курсор на раздел Removable Devices:
-
2.
Наведите курсор на пункт Floppy и кликните Settings..:
-
3.
Кликните по строке Floppy и нажмите Remove:
-
4.
Подтвердите удаление. Для этого кликните Ок во всплывающем окне, а затем Ок внизу страницы:
Готово, вы активировали кнопку.
Microsoft Deployment Toolkit
MDT is a free deployment solution from Microsoft. It provides end-to-end guidance, best practices, and tools for planning, building, and deploying Windows operating systems. MDT builds on top of the core deployment tools in the Windows ADK by contributing guidance, reducing complexity, and adding critical features for an enterprise-ready deployment solution.
MDT has two main parts: the first is Lite Touch, which is a stand-alone deployment solution; the second is Zero Touch, which is an extension to System Center 2012 R2 Configuration Manager.
Note
Lite Touch and Zero Touch are marketing names for the two solutions that MDT supports, and the naming has nothing to do with automation. You can fully automate the stand-alone MDT solution (Lite Touch), and you can configure the solution integration with Configuration Manager to prompt for information.
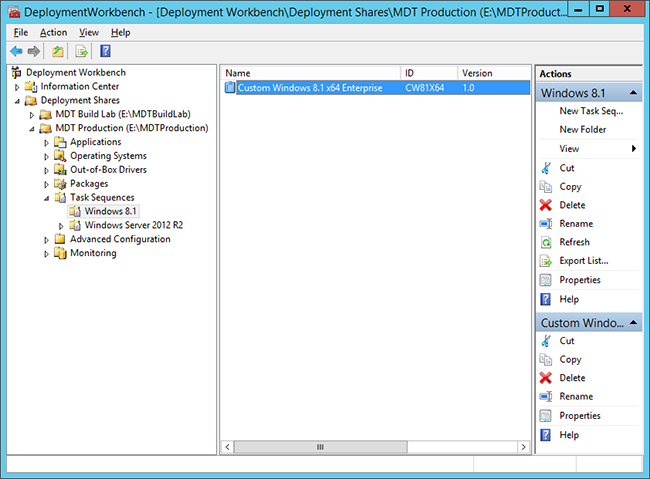
The Deployment Workbench in, showing a task sequence.
For more information on MDT, see the Microsoft Deployment Toolkit resource center.
USB4TM Test Tools
USB4CV Tool
This tool is used to test the Logical Layer, Protocol Layer, and Tunneling functionality of a USB4 Router. This tool takes control over the USB4 Connection Manager and renders all products connected to it unusable. USB4CV should not be installed on an oscilloscope or any system that uses USB as its only form of input from the user.
The USB4CV tool Ver. 0.9.2.3 (Updated June 21, 2021) is available below.
USB4CV 64-bit Windows
NOTE 1: In order to use USB4CV, User Account Control (UAC) must be turned off. After turning off UAC, the system must be rebooted.
NOTE 2: The USB4CV tool is supported on Windows 10 and above.
Free Windows installation program
Windows 7 USB DVD Download Tool is a free utility program that creates bootable USB flash drives or DVD for Windows 7 32- and 64-bit operating systems. When people install Windows systems from the Microsoft Store, they can either download a collection of compressed installation files or an uncompressed ISO file; the freeware is developed by Microsoft to install the ISO file onto a PC machine.
Does Windows 7 USB DVD Download Tool work Windows 10?
The application functions with Windows 7, , and systems along with Windows Vista and XP SP2 models. If the Windows XP users intend to operate the app, then there are applications to install before: Microsoft .NET Framework 2.0 and Microsoft Image Mastering API v2. Along with the Windows USB DVD Download Tool, people will need to have purchased and downloaded the Windows ISO file.
The system requires 50 MB of storage space on the hard disk as well as a DVD-R drive or removable USB device with a minimum of 4 GB available. Essentially, users need the ISO file, the download tool, and either the blank DVD drive or the 4GB or higher USB.
How do I convert Windows ISO to USB?
The lightweight platform has an easy to use interface; fundamentally, the program is created for people who are not adept in technical skills for them to perform the process. If the Microsoft community does need assistance, then within the user interface there is an ‘Online help’ option. Essentially, the tools Windows offers in the app are presented in four steps.
Each step is displayed on a small and simple interface. Lining the top of the tool is the distinction of which step the user is on within the procedure. Upon the download, Windows greets people with a screen that reads ‘Step 1 of 4: Choose ISO file’. Below the instruction is a space to either insert or searches for the source file with the browser.
Once the article is retrieved, ensure that the encased space presents the correct information. If the data is accurate, then press the green ‘Next’ button in the bottom right corner to continue. The setup continues into ‘Step 2 of 4’ on the following page: ‘Choose media type’.
The directions inform the community that they can either burn the ISO file to a DVD or copy the uncompressed file to a USB Pendrive. If people are using the USB backup, then they need to utilize a USB that has 4GB or more to ensure that the file size is compensated for.
To be allowed to continue, select either ‘USB device’ or ‘DVD’ in the lower right corner. Confirm that the DVD or USB is placed into the computer. Note that there is a ‘Start over’ button presented in the lower-left section to restart the boot order. Step 3 includes a dropdown menu to verify the inserted media.
If the USB or DVD information is not visible, then there is a refresh key that can be chosen beside the menu. Ensure that any content that is within the external devices is safely copied to another location. If there is data on the equipment, then a message will appear to notify the user that there is not enough disk space to continue.
How do I create a bootable flash drive?
Either choose the erase route or cancel the operation. Once the disc or drive has been identified, click ‘Begin copying’. The final step is creating the bootable drive. A loading bar will be placed in the center of the page that details the progress of the root folder being combined with the DVD or USB port equipment.
When the integration is complete the window will display the text: ‘Bootable USB device created successfully’. To the right of the loading bar ‘100%’ will be present and below the bar, the status will read ‘Backup complete’.
Additional installer program
Rufus creates bootable discs and drives in a variety of formats. As the developer, Microsoft created the Windows USB DVD Tool for their single existing operating system: Windows 7, 8, 10, etc. Rufus is an impressive option that is recommended for anyone that wishes to create bootable equipment for free on other systems: Linux, UEFI, etc.
Follow the steps to install
The Windows USB DVD Download Tool provides succinct steps that are individually presented to install their system with a DVD or USB drive. There are four steps total.
This tool is compatible with the Windows 7 OS and above. Visit their official site to view any new versions and updates as well as the latest company news, terms, etc.
Изменения
-
Версия 3.15 (2021.08.03)
- Update GRUB to version 2.06
- Add support for files (Ventoy Sparse Image, courtesy of longpanda/ventoy)
- Add workaround for openSUSE Live ISOs
- Move default app directory to and always save a log there on exit
- Fix AppStore version of Rufus not being able to store downloaded files
- Fix failure to open Syslinux/GRUB files when Rufus is located at the root of a drive
- Prevent the creation of on ESPs written in DD mode
- Prevent drive letter assignation to the UEFI:NTFS partition
- Prevent persistent partition creation errors due to size
- Wnhance safety checks before running the Fido ISO download script
- Other internal fixes and improvements
- Другие версии
Процедура создания загрузочного носителя с Windows 7
К сожалению, возникновение ошибок в ПК на Windows явление частое. Поэтому каждый раз вызывать мастера для устранения неполадок неудобно и самое главное накладно.
Проще самостоятельно один раз овладеть навыком переустановки ОС.
Для этого в первую очередь требуется загрузочный внешний носитель с дистрибутивом системы. Специалисты «Майкрософт» значительно облегчили пользователям своей «Седьмой» ОС процедуру создания загрузочного диска или флешки, сделав для этого специальную утилиту.
Вопросу, как пользоваться этой программой «Windows 7 usb/dvd download tool» и посвящена нижеописанная пошаговая инструкция с иллюстрациями к исполняемым действиям.
Данное приложение доступно на официальном ресурсе «Майкрософт» совершенно бесплатно: «store.microsoft.com». Она позволяет создать загрузочную флешку либо ДВД-диск из образа с Windows 7 с расширением «.iso».
Потом можно купить ключ активации официально, либо воспользоваться одним из множества существующих активаторов.
Чтобы записать собственную загрузочную флешку или диск с Windows 7, достаточно установить фирменную утилиту от Майкрософт и запустить ее. Далее необходимо выполнить следующие шаги:
- В первом диалоговом окне надо клацнуть виртуальную кнопку «Обзор» или «Browse» (необходимо отметить, что программа также имеет и русский интерфейс, но даже использование английского меню не затруднит процедуру записи носителя и для начинающего пользователя, поскольку имеет интуитивно понятное исполнение);
- Далее отобразится окошко, в котором потребуется указать месторасположение в памяти компьютера файла-образа с Windows 7;
- Клацнуть «Открыть»;
- Затем в меню утилиты кликнуть «Далее» или «Next»;
- Теперь необходимо вставить в USB-разъем компьютера флешку, у которой емкость не меньше размера файла дистрибутива с ОС, который планируется записать (обычно достаточно флеш-памяти не менее 4 Gb, но для 100%-ой уверенности рекомендуется применять флешку на 8 Gb). Если пользователь решил использовать ДВД-диск, то вставить его в оптический привод (объем памяти диска должен быть не меньше 4,7 Gb);
- Далее в меню утилиты клацнуть по соответствующей кнопке: «USB Device» либо «DVD», в зависимости от того, какой тип носителя выбрал пользователь в предыдущем пункте под номером 5.
 Примечание: Если на флешке были сохранены какие-либо пользовательские файлы, то после выполнения следующего этапа инструкции все сотрется.
Поэтому заблаговременно требуется позаботиться о копировании важной информации на другой носитель или в один из логических разделов компьютера. Это же касается и в случае использования DVD-RW
Даже если объем съемного носителя превышает количество отводимого места для дистрибутива операционной системы, то все равно при форматировании вся информация будет уничтожена.
- Затем в программе клацнуть кнопку с круговыми стрелочками под названием «Обновить» или в английском интерфейсе «Refresh». Убедиться, что вставленный в ПК носитель распознан приложением и кликнуть «Старт» (в английском варианте на кнопке будет надписано: «Start over»);
- Дождаться завершения процесса. Обычно на него уходит не более четверти часа;
- Готово. Загрузочный носитель готов к использованию.
fsutil
The fsutil utility can be used to perform all sorts of NTFS and FAT operations, including file manipulation. Of these, the following are useful for OS developers:
| Subcommand | Parameter | Description |
|---|---|---|
| 8dot3name | query | This can be used in order to find out whether a volume (which may very well be a loopback device) is configured to use the 8.3 file naming scheme. Example:
fsutil 8dot3name query C: If no volume is specified, information on all volumes is displayed. |
| set | This option can set one or all volumes to (not) use the 8.3 file name scheme. Before this can be used on a per volume basis, the registry key HKLM\System\CurrentControlSet\Control\FileSystem\NtfsDisable8dot3NameCreationNtfsDisable8dot3NameCreationNtfsDisable8dot3NameCreation must be set to the value 2, if this is not already true. This can be done by using the following command:
fsutil 8dot3name set 2 Next, we are free to play around with individual volumes: fsutil 8dot3name set C: 0 The last parameter can take the value 0 (enable) or 1 (disable). This is somewhat odd; the reason behind it is probably that Microsoft, in order to avoid confusion, decided to preserve these values, which are also used in a similar command. |
|
| file | createnew | Creates an empty file (all zeroes) of some size specified, in bytes. Example:
fsutil createnew foobar 42 |
| setshortname | Sets the 8.3 name for a file (while preserving its long name). Example:
fsutil setshortname foobarbaz fooba~1 |
|
| setvaliddata | Sets the VDL for a file. Example:
fsutil setvaliddata foobar 4096 |
|
| setzerodata | Sets one or more bytes in a file to zero. Example:
fsutil setzerodata foobar offset=42 length=42 foobar |
Products Used for Testing
Known Good Products and Interoperability Products
USB Type-C IOP/CV Test Equipment
Please contact ssusbcompliance@usb.org for a list of devices used for USB PD and USB Type-C Interop Testing. Please note the equipment list is expected to change periodically as equipment models are discontinued or reach end of life.
USB Certification Platform
Hosts, hubs and peripherals must be certified using Windows 10 (64-bit OS). USB-IF testing must be done on one of these systems:
- Although not currently available on the market the following systems can still be used for testing:
- Currently available through third party distributors
- The latest Microsoft USB driver stack is used, and is updated by running Windows Update. The BIOS should be updated to the latest version. Please follow the PDK TechGuide document (TechGuide_xHCI_SSUSB_PDK_Ver2.2) for modifications to the DELL system being used. If you have further questions about the system configuration, email ssusbcompliance@usb.org.
EHCI Add-in Card:
- Belkin F5U252.
- Example purshase link: https://www.amazon.com/Belkin-Hi-Speed-4-Port-F5U252-4-External/dp/B06Y4DSPD1
Compliance Test Systems
- Link Layer Test specification (USB 3.2 Gen2x1)Teledyne LeCroy Voyager M310P / M310C
- Link Layer Test specification (USB 3.2 Gen1x1)Teledyne LeCroy Voyager M310P / M310C Teledyne LeCroy Voyager M3x
- Hub LVS Test specification (USB 3.2 Gen2x1)Teledyne LeCroy Voyager M310P / M310C
USB 3.0 xHCI-based PDK Support
Fresco Logic Host Controller (Point Grey P/N: U3-PCIE2-2P01X)
USB-IF is using the FL1100 to test LPM L1 compliance of peripherals and hubs. The Fresco FL1100 is available for purchase at Point Grey with part number U3-PCIE2-2P01X here. This is equivalent to formerly available Fresco Logic PDK.
Requirements are as follows:
- This must be run with the Fresco driver installed, not in-box Microsoft driver.
- The Fresco driver version is 3.6.8.0.
- Included with this driver package are registry modifications that affect U1/U2 and LPM L1 operation (Fresco driver only).
- Run FrescoU1U2Enable-LPMEnable.reg and reboot your computer before testing with the Fresco driver to duplicate USB-IF usage.
User Documentation:PDK Technical Guide Version 2.1USB 3.1 Command Verifier Compliance Test Specification Version 0.72
What’s New
What’s New (August 18, 2021)
-
Candid talk from the man behind your favorite Windows tools
Mark talks with Larry Seltzer about the history and future of Sysinternals. -
Autoruns v14.0
Autoruns, a utility for monitoring startup items, is the latest Sysinternals tool to receive a UI overhaul including a dark theme.
What’s New (July 27, 2021)
ProcDump v10.1
This update to ProcDump, a command-line utility for generating memory dumps from running processes, adds a new option (-dc) for specifying a dumpfile comment and supports «triage» dumps (-mt).
What’s New (June 22, 2021)
RDCMan v2.8
RDCMan, a utility for managing multiple remote desktop connections, is now part of the Sysinternals family of tools! This release fixes CVE-2020-0765, an XML parsing vulnerability.
What’s New (May 25, 2021)
-
Process Monitor v3.80
Process Monitor is the latest tool to integrate with the new Sysinternals theme engine, giving it dark mode support. -
Sysmon v13.20
This update to Sysmon, an advanced system security monitor, adds «» and «» filter conditions and fixes a regression for rule include/exclude logic. -
TCPView v4.10
This update to TCPView, a TCP/UDP endpoint query tool, adds the ability to filter connections by state. -
Process Explorer v16.40
This update to Process Explorer, an advanced process, DLL and handle viewing utility, adds process filtering support to the main display and reports process CET (shadow stack) support.
What’s New (April 21, 2021)
-
Process Monitor v3.70
This update to Process Monitor allows constraining the number of events based on a requested number minutes and/or size of the events data, so that older events are dropped if necessary. It also fixes a bug where the Drop Filtered Events option wasn’t always respected and contains other minor bug fixes and improvements. -
Sysmon v13.10
This update to Sysmon adds a FileDeleteDetected rule that logs when files are deleted but doesn’t archive, deletes clipboard archive if event is excluded and fixes an ImageLoad event bug. -
Theme Engine
This update to the theme engine uses a custom title bar in dark mode, similar to MS Office black theme. WinObj and TCPView have been updated. Expect more tools using the theme engine in the near future!
What’s New (March 23, 2021)
TCPView v4.0
This major update to TCPView adds flexible filtering, support for searching, and now shows the Windows service that owns an endpoint. It is also the second Sysinternals tool to feature the new theme engine with dark mode.
What’s New (February 22, 2021)
-
WinObj v3.0
This major update to WinObj adds dynamic updates, quick search, full search, properties for more object types, as well as performance improvements. It’s also the first Sysinternals tool to feature a dark theme. -
Coreinfo v3.52
This update to CoreInfo adds reporting for CET (shadow stack) support.
Выбор подходящего носителя
Я рекомендую использовать внешний USB-винчестер – объемы таких жестких дисков достаточны для хранения образов, а подключать их удобно и просто.
Возможны и другие варианты, но не советую сохранять архив на диск, который является системным, более того, винда в некоторых случаях может и не предоставить такой возможности вообще.
Объем DVD-диска для таких нужд маловат, а разделять полный образ на десяток кусков, каждый из которых записан на отдельный DVD-диск, – явно не лучшее решение.
Сохранение на флэшку тоже возможно, но запись в таком случае может растянуться на слишком длительное время. Кстати на блоге есть статья про создание загрузочной флешки.
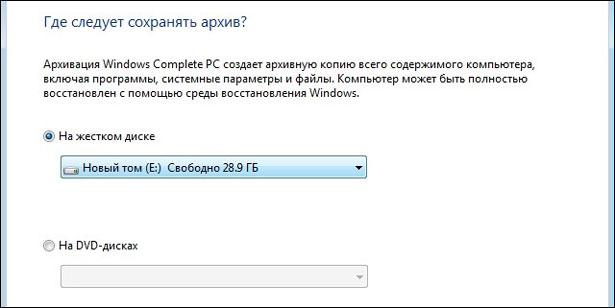
В общем, выбираете то, что больше подходит для вашего случая, подключаете все необходимые устройства и нажимаете «Далее».
В следующем окне проверяете, действительно ли все правильно назначено – диски для архивирования и расположение резервной копии (окно так и называется: «Подтверждение параметров архивации») – и нажимаете кнопку «Архивировать».
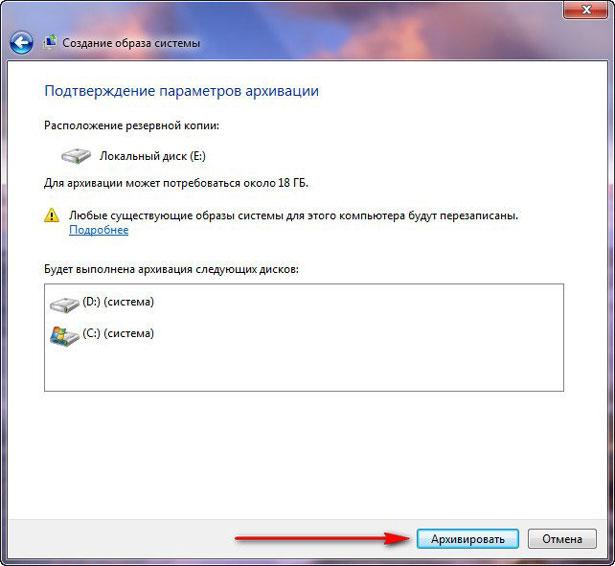
До завершения процесса необходимо оставить компьютер в покое – не выключать, не запускать никаких программ, не прерывать процесс архивации.
В дополнение к сохраненному образу можно сделать загрузочный диск, выбрав пункт «Создать диск восстановления системы». Он может понадобиться, если у вас нет установочного диска, в котором содержится дистрибутив винды и все необходимые утилиты. Обращаться туда же – к «Панели управления», затем в «Архивацию и восстановление».
Создание точной копии флешки, с помощью USB Image Tool
Иногда есть необходимость создать, либо сохранить резервную копию флеш носителя. Речь идет о не простом копировании данных с одного носителя на другой, а о полной передачи данных с сохранением контрольных сумм и работоспособностью программ, если таковые имеются.
К примеру, у вас на флеш носителе установлена программа, для сохранения паролей, которой вы очень часто пользуетесь, извлекая её и запуская на разных устройствах. Со временем флеш накопитель может прийти в негодность по разным причинам, из-за неправильного обращения, плохое качество по вине производителя и так далее. Однако если у нас есть копия, то переживать по этому поводу особо не стоит. Все что нам понадобится для её восстановления, это копия, созданная при помощи программы «USB Image Tool» и другая рабочая флешка с необходимым объёмом памяти.
Скачать программу вы можете по ссылкам приведённым ниже. Программа «USB Image Tool», очень проста и не требует установки. Достаточно скачать программу, распокавать и запустить файл USBImage Tool.exe (Рисунок 1).
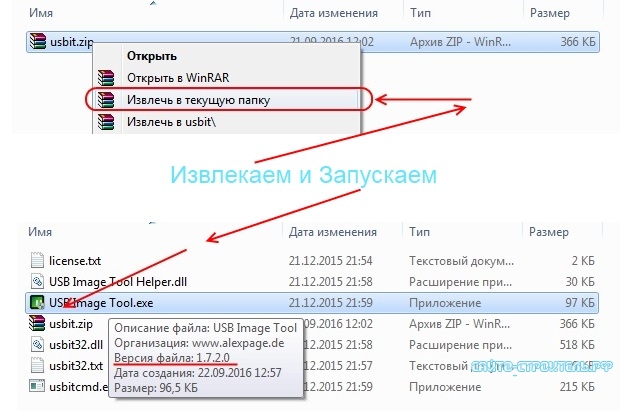
Рисунок 1
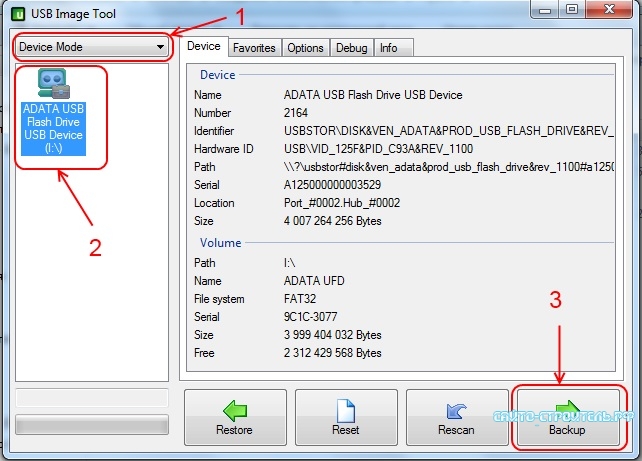
Далее выбираем режим «Device Mode» . Затем в правом окне программы мы видим флеш накопители, которые сейчас подключены к компьютеру, выделяем необходимую флешку сделав клик по ней. В правом окне мы сразу увидим информацию о носителе. Для создания резервной копии жмем «Backup» (Рисунок 2).
Рисунок 2
В заранее созданной папки, для хранения резервных копий флеш носителей, или в любой другой, в той которой удобно вам, придумываем имя резервной копии и жмем на сохранение (Рисунок 3).
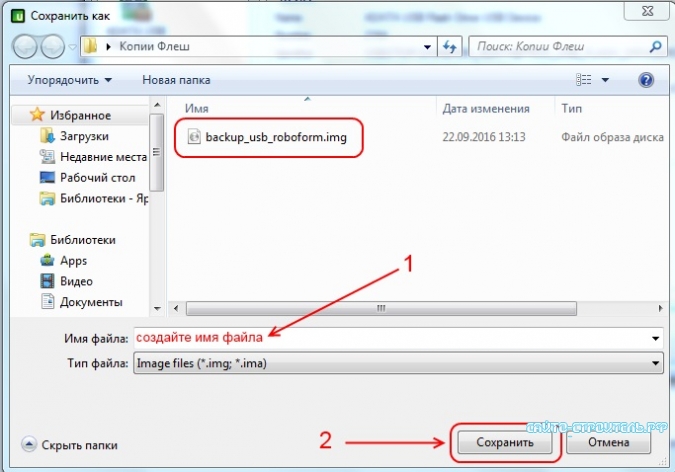
Рисунок 3
Теперь ничего не трогаем, началось создание резервной копии. В левом нижнем углу вы увидите индикатор с процентной шкалой, который показывает в реальном времени, сколько процентов резервной копии создано. Далее программа просто подаст звуковое оповещение о том, что копия создана (Рисунок 4).
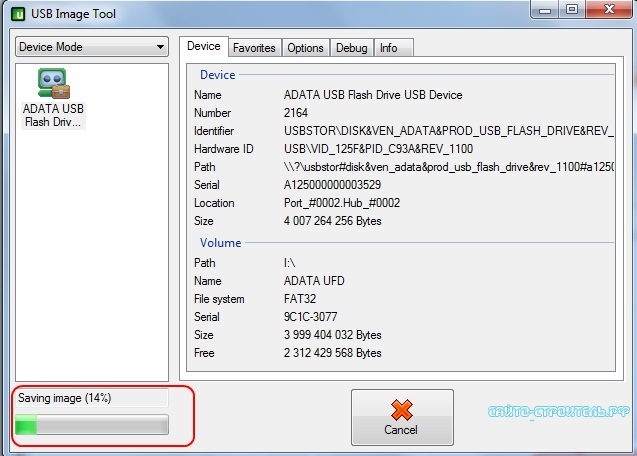
Рисунок 4
Резервная копия флешки готова и сохранена. Если у вас появится необходимость восстановить её на другом носителе, то просто подключите последний к компьютеру и дождитесь, пока он появится, в левом окне программы.
Далее опять переключаемся в режим «Device Mode», выбираем флеш носитель на который будем копировать созданный «бэкап» и нажимаем «Restore» (Рисунок 5).
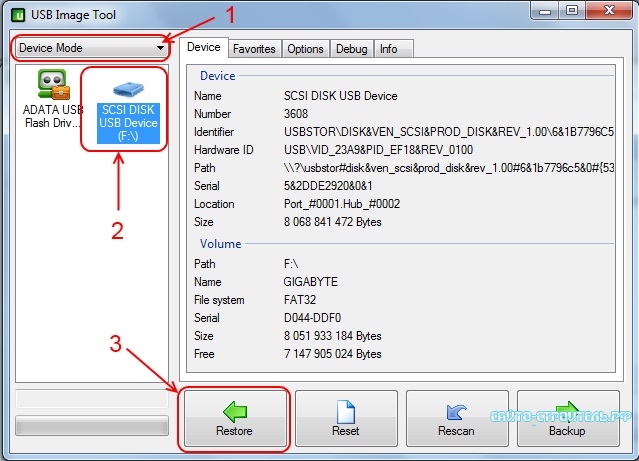
Рисунок 5
Выбираем ранее созданную резервную копию, которую хотим восстановить и жмем «Открыть» (Рисунок 6).
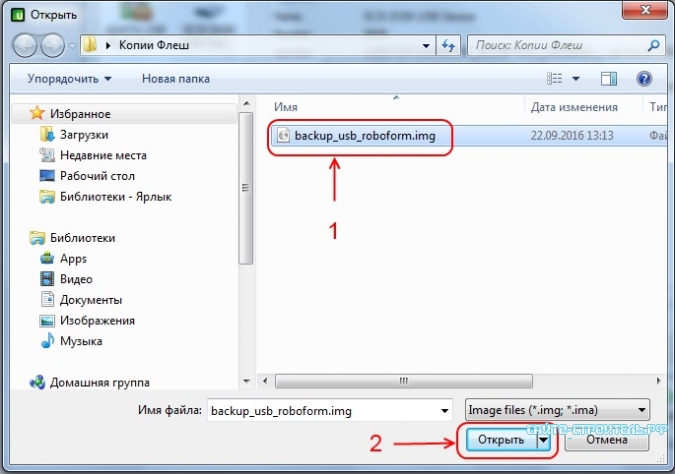
Рисунок 6
После этого программа повторно, спросит у нас действительно ли мы хотим восстановить выбранный «бэкап» на указанную флешку. На что мы ответим согласием, нажав на кнопку «Да» (Рисунок 7).
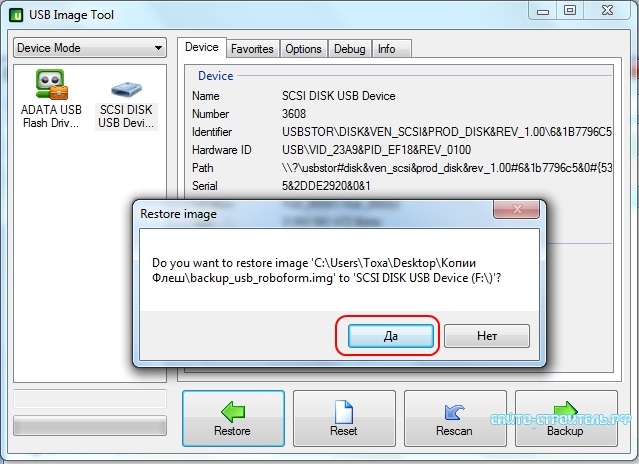
Рисунок 7
Внимание!!!
Если флеш носитель, на который вы хотите записать образ, какого либо флеш устройства, не отформатирован, либо имеет записи, то программа отформатирует его, предварительно запросив у вас согласия на данные действия. Поэтому сохраните данные, если они имеются на носителе, который предстоит отформатировать. Если они вам нужны!