Проверка и восстановление целостности системных файлов windows 7/10
Содержание:
- Прочие способы
- /Capture-Image
- DISM Error 87 Overview
- DISM.exe /Online /Cleanup-Image /Restorehealth: Frequently Asked Question
- Устранение проблем с DISM с помощью образа WIM
- What to Do After Solving DISM Error 87?
- Причина ошибки 87 в DISM
- Ошибка DISM. Операция не проводилась
- /Commit-Image
- How To Extract Install.WIM from Windows 10 ISO
- Как исправить ошибку DISM 50 в Windows 10?
- What does the System Update Readiness tool do
- /Export-Image
- Дополнительная информация
Прочие способы
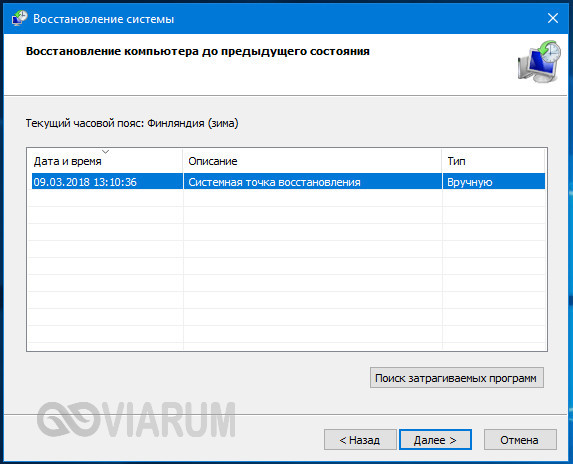
Что касается вопроса, как восстановить полностью удаленные системные файлы, тут всё и так должно быть ясно. Если позволяют размеры диска, регулярно создавайте резервные копии системного раздела или, по крайней мере, не отключайте защиту системы, чтобы в случае чего иметь возможность выполнить откат к предыдущей контрольной точке.

И последнее, на что хотелось бы обратить внимание. Если вы скачали и установили пользовательскую сборку, будьте готовы к тому, что SFC более чем наверняка найдёт в ней поврежденные файлы
Причина очень проста – сборщики очень часто модифицируют свои образы, заменяя, к примеру, оригинальные иконки в библиотеках и прочее. Поэтому перед тем, как производить восстановление оригинальных файлов, подумайте, действительно ли это вам нужно, если в работе системы не наблюдается неполадок.
/Capture-Image
Captures an image of a drive to a new .wim file. Captured directories include all subfolders and data. You cannot capture an empty directory. A directory must contain at least one file. DISM can also optionally apply and capture extended attributes (EA).
You can capture the image as a Windows image (.wim) file or a set of split Windows image (.swm) files, but this option doesn’t support capturing a virtual hard disk (.vhd/.vhdx) file. See if you are looking to capture an FFU.
Syntax:
| Parameter | Description |
|---|---|
| /ConfigFile | Specifies the location of a configuration file that lists exclusions for image capture and compress commands. For more information, see DISM Configuration List and WimScript.ini Files. |
| /Compress | Specifies the type of compression used for the initial capture operation. The maximum option provides the best compression, but takes more time to capture the image. The fast option provides faster image compression, but the resulting files are larger than those compressed by using the maximum option. This is also the default compression type that is used if you do not specify the argument. The none option does not compress the captured image at all. |
| /Bootable | Marks a volume image as being a bootable image. This argument is available only for WinPE images. Only one volume image can be marked as bootable in a .wim file. |
| /CheckIntegrity | Detects and tracks .wim file corruption when used with capture, unmount, export, and commit operations. /CheckIntegrity stops the operation if DISM detects that the .wim file is corrupted when used with apply and mount operations. |
| /Verify | Checks for errors and file duplication. |
| /NoRpFix | Disables the reparse point tag fix. A reparse point is a file that contains a link to another file on the file system. If /NoRpFix is not specified, reparse points that resolve to paths outside of the value specified by /ImageFile will not be captured. |
| /WIMBoot | Use /WIMBoot to append the image with Windows image file boot (WIMBoot) configuration. This only applies to Windows 8.1 images that have been captured or exported as a WIMBoot file. This feature isn’t supported in Windows 10. |
| /EA | Captures extended attributes. The switch must be explicitly specified to capture extended attributes. DISM will capture extended attribute bits if they are set in the components to be captured in the WIM image. If the bits are not set, DISM won’t set them. Only the inbox components of CAB packages and drivers will have these extended attribute bits, not the AppX package components or Win32 application components. Extended attributes with prefix “$Kernel.” in name will be skipped because only user mode extended attributes are captured. If you use DISM in Windows 10, version 1607 to capture extended attributes and use an earlier version of DISM to apply the image, the operation will succeed but the extended attributes will not be set to the applied image. |
Examples:
DISM Error 87 Overview
So long as there are any missing or corrupted Windows images or there is a need to repair Windows 10 update errors, users are prone to run the image repairing tool-DISM. While recently, according to your reports, many of you are encountering cannot clean up Windows 10 image – Error: 87. The DISM log file can be found at C:WINDOWSLogsDISMdism.log.
Often, after SFC command sfc/scannow doesn’t work or fails to fix Windows file errors, you start to take advantage of DISM, and usually, it would take you 20 or more minutes to use DISM /restorehealth, but the error is you just stumble upon error 87 DISM the parameter is incorrect.
Or what you hit upon may be DISM error code 112, 11, 50, 2, 3, 87, 1910, 0x800f081f. Anyway, once DISM failed after Windows updates or whenever, you would find it hard to fix many system image issues, thus numerous system crashes, such as black screen with cursor. Now try to get down to resolving this DISM cleanup-image error 87 for Windows 10.
DISM.exe /Online /Cleanup-Image /Restorehealth: Frequently Asked Question

This section answers frequently asked DISM.exe questions
1. What is DISM.exe?
DISM.exe (Deployment Image Servicing and Management) is a Windows command-line tool used to manage Windows images. The tool can be used to manage running operating systems or Operating System images and VHDs.
2. What Is DISM.exe /Online /Cleanup-image /RestoreHealth?
This DISM command repairs the windows operating system it runs on. The /Online switch forces DISM to scan the operating system for errors – it fixes any errors.
3. Is DISM Safe To Run?
DISM.exe is a legitimate Windows command that manages both online and offline Windows images. It is completely safe to run DISM.exe
4. How Long Does It Take for DISM /Online /Cleanup-image /RestoreHealth To Run?
It take between 10 minutes to a few hours for DISM /Online /Cleanup-image /RestoreHealth to run. How long it takes depends on how much errors it finds and needs to fix
5. Should I run DISM or SFC First?
It is recommended to run SFC first. Then, run DISM /Online /Cleanup-image /RestoreHealth. SFC checks for Windows file integrity violations and tries to fix them. However, DISM is more effective at fixing corrupt Windows Operating System files.
Recommended Posts:How to Run CHKDSK on Windows 1020 Command Prompt Commands for SysAdmins
“DISM.exe /Online /Cleanup-Image /Restorehealth” is a very important and helpful Window command!
I hope you found this Itechguide helpful?
You could ask a question, leave a comment or provide feedback with the “Leave a Reply” form found towards the end of this page.
Finally, for more Itechguides like this, visit our Windows & Linux Explained page.
- Was this post helpful?
Устранение проблем с DISM с помощью образа WIM
Средство DISM вряд ли столкнется с проблемами, но в редком случае, когда Центр обновления Windows вызывает проблемы с получением заменяющих файлов или у вас нет подключения к Интернету, вам нужно будет использовать альтернативный источник для восстановления файлов с помощью другого образа с опцией источника.
Прежде чем вы сможете указать другой источник, вам понадобится файл install.wim или install.esd с другого компьютера, загрузочный установочный носитель или файл ISO
Кроме того, важно, чтобы источник файлов соответствовал той же версии, редакции и языку Windows 10, которые вы используете на своем компьютере
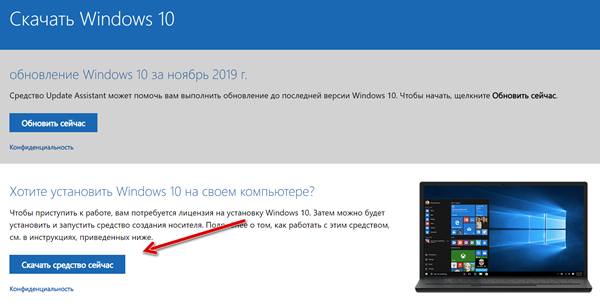
Скачать Windows 10 ISO файл
Рекомендуемый метод доступа к хорошему образу – использовать Media Creation Tool для загрузки ISO-образа Windows 10.
Чтобы загрузить ISO-файл Windows 10, выполните следующие действия:
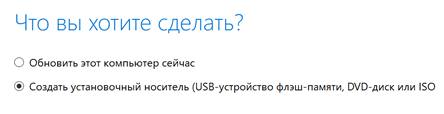
После выполнения этих действий вы можете использовать DISM с опцией «Источник» для восстановления локального образа Windows 10.
Исправить образ восстановления Windows 10
Чтобы запустить DISM, указав другой исходный образ (install.wim), выполните следующие действия:
DISM /Online /Cleanup-Image /RestoreHealth /Source:D:\Sources\install.wim
В команде обязательно замените букву «D» на букву, соответствующую точке монтирования ISO.
(Необязательно) Введите следующую команду, чтобы ограничить использование Центра обновления Windows, и нажмите Enter :
DISM /Online /Cleanup-Image /RestoreHealth /Source:D\Sources\install.wim /LimitAccess
(Необязательно) Введите следующий вариант предыдущей команды для выполнения той же задачи и нажмите Enter :
DISM /Online /Cleanup-Image /RestoreHealth /Source:wim:D:\Sources\install.wim:1 /LimitAccess
В этой команде обязательно измените «D:\Sources» на путь, который соответствует расположению файла install.wim.
После того, как вы выполните эти шаги, команда отсканирует и устранит все проблемы, используя указанный вами образ install.wim.
Устранение проблем с использованием образа ESD
Кроме того, если у вас есть зашифрованный образ install.esd из недавнего обновления, вы можете использовать его для восстановления поврежденных файлов.
Чтобы запустить DISM, указав другой исходный образ (install.esd), выполните следующие действия:
DISM /Online /Cleanup-Image /RestoreHealth /Source:C:\$Windows.
В этой команде обязательно измените «C:\$Windows.
BT\Sources» на путь, который соответствует расположению файла install.esd (если применимо).
(Необязательно) Введите следующую команду, чтобы ограничить использование Центра обновления Windows, и нажмите Enter :
DISM /Online /Cleanup-Image /RestoreHealth /Source:C:\$Windows.
(Необязательно) Введите следующий вариант предыдущей команды для выполнения той же задачи и нажмите Enter :
DISM /Online /Cleanup-Image /RestoreHealth /Source:esd:C:\$Windows.
(Необязательно) Введите следующую команду, чтобы использовать файл install.esd, расположенный на другом диске, и нажмите Enter :
DISM /Online /Cleanup-Image /RestoreHealth /Source:D:\Sources\install.esd
В этой команде обязательно измените «D:\Sources» на путь, который соответствует расположению файла install.esd.
После выполнения этих шагов командный инструмент обслуживания образов найдёт и восстанавит поврежденные файлы, используя файлы, включенные в образ install.esd. Как только процесс завершится, файлы журнала будут сохранены в %windir%/Logs/CBS/CBS.log и в %windir%\Logs\DISM\dism.log будут зарегистрированы все найденные проблемы и проблемы, которые были устранены.
What to Do After Solving DISM Error 87?
After you have fixed the DISM restorehealth error 87, what can you do?
It is strongly recommended to create a system image after fixing this issue. In this way, you can restore your computer to the normal state if you encounter the error 87 DISM again in later.
In addition, if you encounter some other OS problems during the using process, you can also restore your computer to a previous state with the system image created before.
Thus, do you know how to back up computer or create system image easily? To easily keep data safe, MiniTool ShadowMaker would be a good choice.
MiniTool ShadowMaker is a piece of professional Windows backup software which is specializing in backing up disks, partitions, files, folders and the operating system.
Besides backup feature, it is also a clone tool which can clone OS from HDD to SSD without data loss.
So, with so many features, download MiniTool ShadowMaker Trial from the following button immediately or choose to purchase an advanced edition.
Now, we will show you how to back up computer with the step-by-step guide.
Step 1: Launch MiniTool ShadowMaker
- Download MiniTool ShadowMaker and install it on your computer.
- Launch it.
- Click Keep Trial to continue.
- Choose Connect in This Computer to continue.

Step 2: Select backup source
- MiniTool ShadowMaker chooses the operating system as the backup source by default. So, there is no need for you to choose it again.
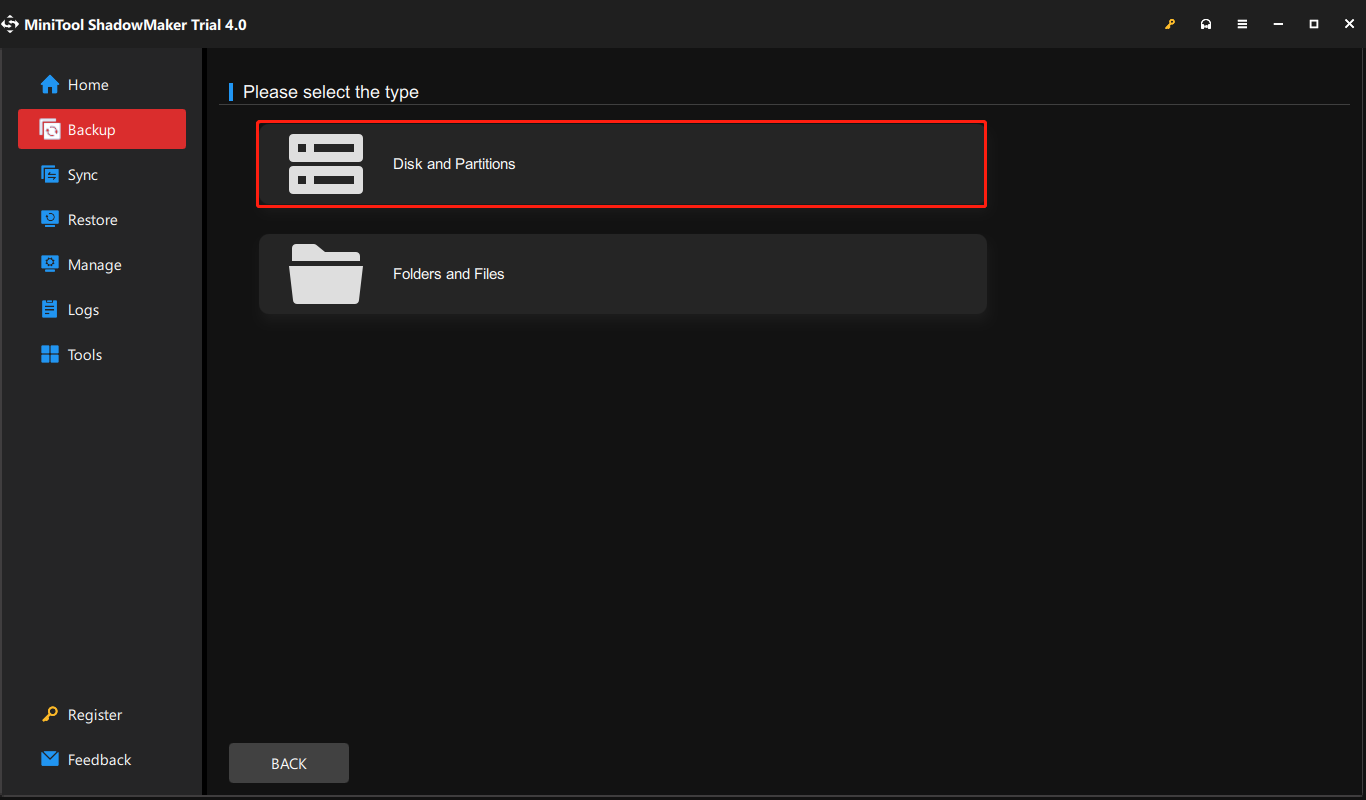
- However, if you want to select backup source by yourself. Please go to the Backup page, click Source module, and choose Disk and Partitions to select the system disk to continue. (If you want to back up files, choose Folders and Files.)
Step 3: Select the backup destination
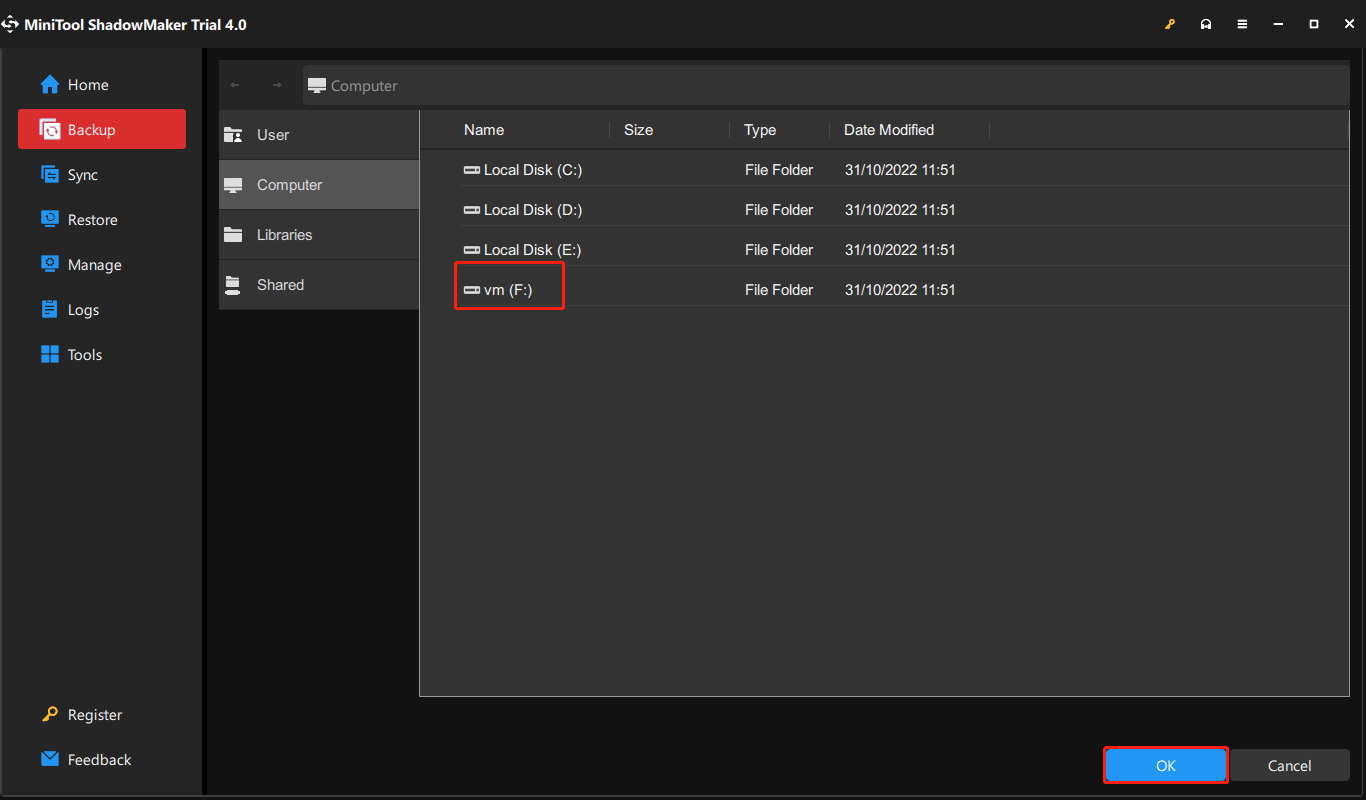
- After returning the backup page, please click Destination module to choose a backup destination.
- Here are five available paths which are Administrator, Libraries, Computer, Network, and Shared folder. It is suggested to save the backup images in an external hard drive. So, click Computer, choose an external hard drive, and click OK to continue.
Here are three points you should pay attention to.
- MiniTool ShadowMaker enables you to create a regular backup. Just click Schedule button at the bottom of Backup page to continue.
- MiniTool ShadowMaker provides three different backup schemes. Click Scheme to change.
- You can also set some advanced backup parameters during the backup process, such as encrypting backup files, etc.
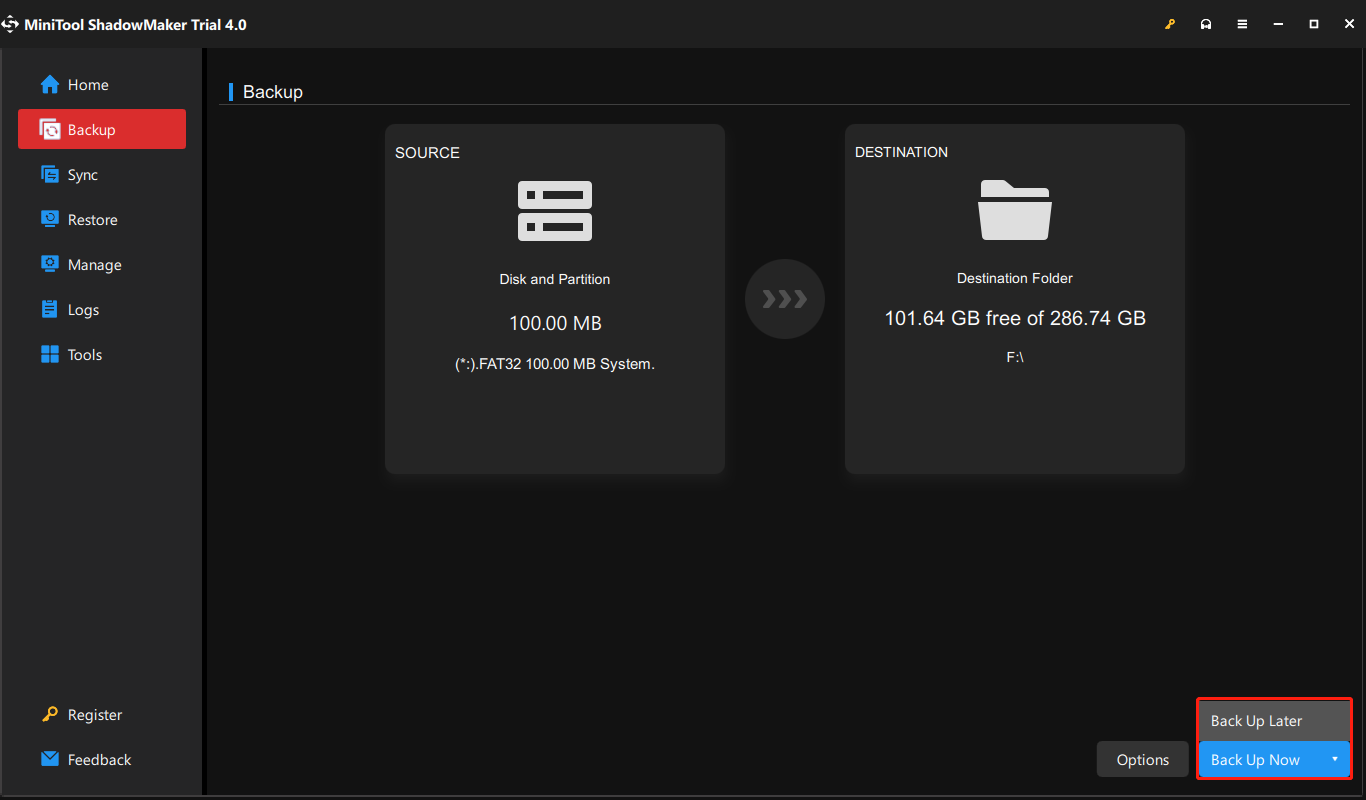
Step 4: Start to backup
- After selecting the backup source and destination, click Back up Now to perform the backup task immediately.
- Or click Back up Later to postpone the backup task and restart it in the Manage page.
When all steps have been finished, you have successfully created a system image. With this system image, you can feel relax even though you encounter the DISM error 87 again or some other system problems because you can restore computer to a previous state.
Причина ошибки 87 в DISM
Как и у других программ ОС Windows, у ошибок при выполнении команд может быть несколько причин:
- Одна из них связана с использованием директории WinSxS. Эта директория исполняет роль резервного хранилища, способного восстановить копии значимых системных файлов. Если пользователь через DISM пытается провести манипуляции, влияющие на целостность системных файлов в этом разделе, то ожидаемо столкнется с правомерным отказом.
- Другие причины заключаются в некорректности написания запросов. Командная строка восприимчива к синтаксису, и поэтому опечатки, неправильные символы и лишние пробелы приведут к ошибке выполнения команд.
- Еще одной возможной причиной станет несоответствие прав доступа запрашиваемым функциям. Категории обычных пользователей по умолчанию не доступны возможности управления командами в DISM. Только пользователи, наделенные правами Администратора, в состоянии выполнять такие запросы в строке управления.
- Отказы по причине использования устаревшей версии Командной строки. На операционной системе Windows 10 должна применяться только актуальная, свежая версия DISM.
Ошибка DISM. Операция не проводилась
Заметив, что многие люди жалуются, что DISM не запускается, я просмотрел веб-сайт и обнаружил следующие 2 случая.
Случай 1:
Случай 2:
Позже в этой статье я покажу вам несколько практических способов справиться с ошибкой DISM. Но перед этим я хотел бы вкратце представить вам DISM.
Как самостоятельно справиться с восстановлением жесткого диска?
 Восстановление после сбоя жесткого диска — как восстановить данные
Насколько я знаю, восстановление жесткого диска при сбое является срочным. Вы должны вовремя спасти данные, прежде чем они исчезнут навсегда.
Читать больше
Что такое DISM
DISM — это аббревиатура от слова Deployment Image Servicing and Management; на самом деле это инструмент командной строки, встроенный в каждую систему Windows (Windows 10, Windows 8, Windows 7 и т. д.). DISM в основном используется для подключения и обслуживания образов Windows (включая те, которые используются для среды восстановления Windows, Windows PE и установки Windows) перед развертыванием. Проще говоря, DISM — это базовая утилита Windows, предназначенная для сетевых администраторов, которая при необходимости выполняет такие задачи, как подготовка, изменение и восстановление системных образов.
Что делает DISM
Вы, как обычный пользователь Windows, также можете использовать инструмент DISM для решения некоторых распространенных проблем. Почему? Это потому, что скрытый образ восстановления на вашем компьютере может оказать вам услугу.
- Используя DISM, вы можете подключать и получать информацию о файлах образа Windows (.wim) или файлах виртуального жесткого диска (.vhd или .vhdx).
- Если вы хотите выполнять какие-либо задачи, такие как захват, разделение или управление WIM-файлами, DISM также может вам помочь.
- Кроме того, инструмент DISM позволяет устанавливать, удалять, настраивать и обновлять такие вещи, как драйверы, функции Windows, пакеты и международные настройки (в файле .wim или .vhd / .vhdx). Все эти операции можно легко выполнить с помощью сервисных команд DISM.
- Подмножества команд DISM можно использовать для обслуживания работающей операционной системы.
- DISM заменяет инструменты развертывания, такие как ImageX, PEimg и Package Manager.
Прочтите эту веб-страницу, если ваша операционная система вышла из строя:
Это еще не конец света, когда операционная система не обнаружит, что вам удастся, так как я предложу вам несколько полезных решений.
/Commit-Image
Applies the changes that you have made to the mounted image. The image remains mounted until the /Unmount-Image option is used.
Syntax:
| Parameter | Description |
|---|---|
| /CheckIntegrity | Detects and tracks .wim file corruption when used with capture, unmount, export, and commit operations. /CheckIntegrity stops the operation if DISM detects that the .wim file is corrupted when used with apply and mount operations. |
| /Append | Adds the modified image to the existing .wim file instead of overwriting the original image. The /CheckIntegrity and /Append arguments do not apply to virtual hard disk (VHD) files. |
Example:
How To Extract Install.WIM from Windows 10 ISO

As I said earlier, before you can use DISM /Online /Cleanup-Image /RestoreHealth command with a WIM file, the file has to be extracted.
Follow the steps below to extract the OS WIM file from install.esd:
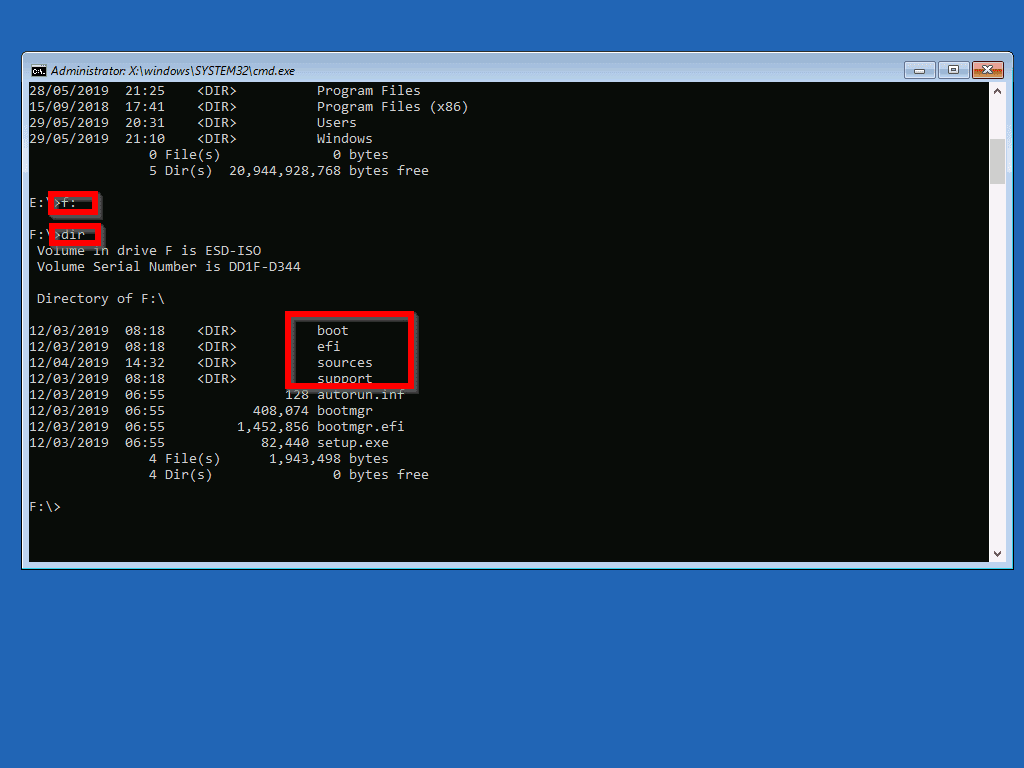
- First, you need to determine the drive your ISO image was mounted. This will depend on the number of drives on your computer. Knowing that it cannot be drive C, try D, then E and so on.
- To change to a drive, enter the drive name, followed by colon then press Enter.
Next, type Dir and press the Enter key.
Keep checking possible drive letters until you find the one with folders, boot, efi, sources and support. This is the drive your Windows 10 ISO is mounted.
Next, you need to find the index number of the Windows 10 edition you wish to use. To do this, execute the command below:
Then, type this command and press the enter key.
The result of the last command is shown below:
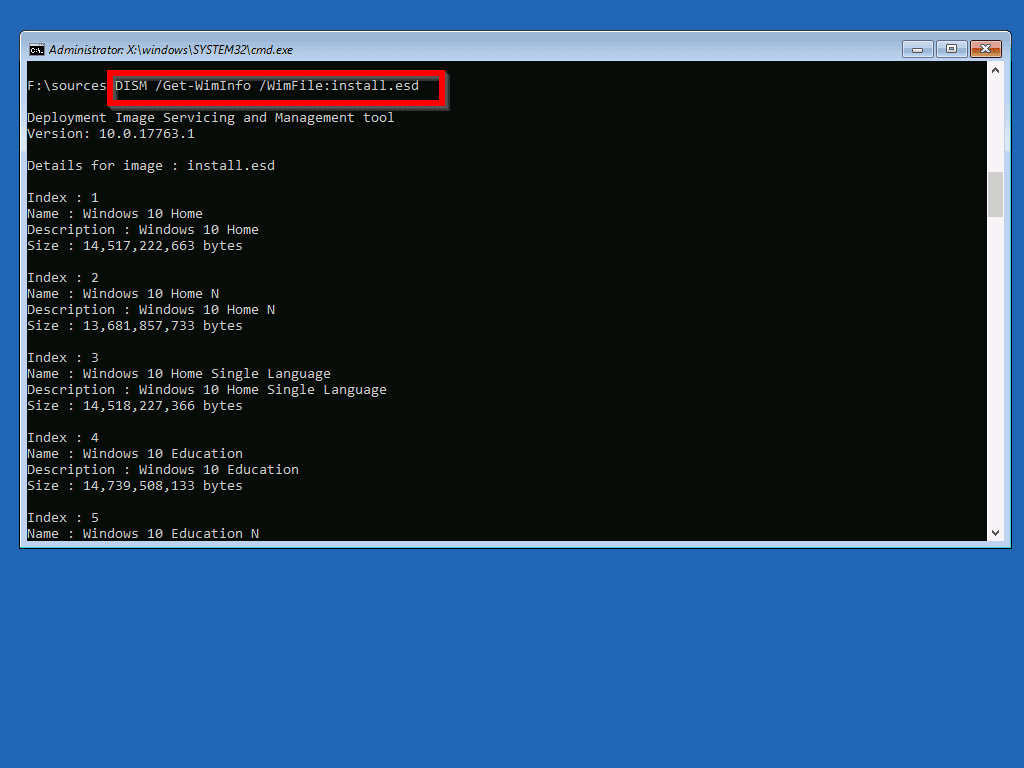
All the Windows 10 editions are listed with their index number. As the edition installed on my computer is Windows 10 Pro, I need to use the same edition for DISM repair. To see the index number, I need to scroll down a bit. Here are the details of Windows 10 Pro.
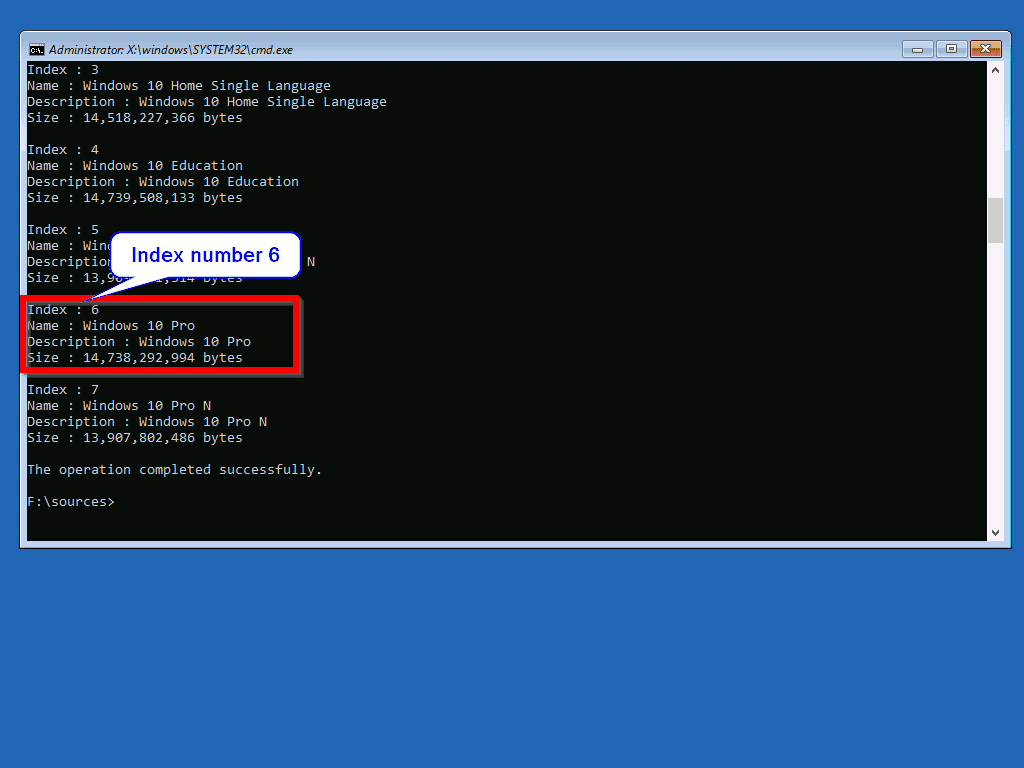
The index number I need is 6.
Before you proceed, you need to create a folder to extract your Install.WIM file to. To do this type the command below and press Enter.
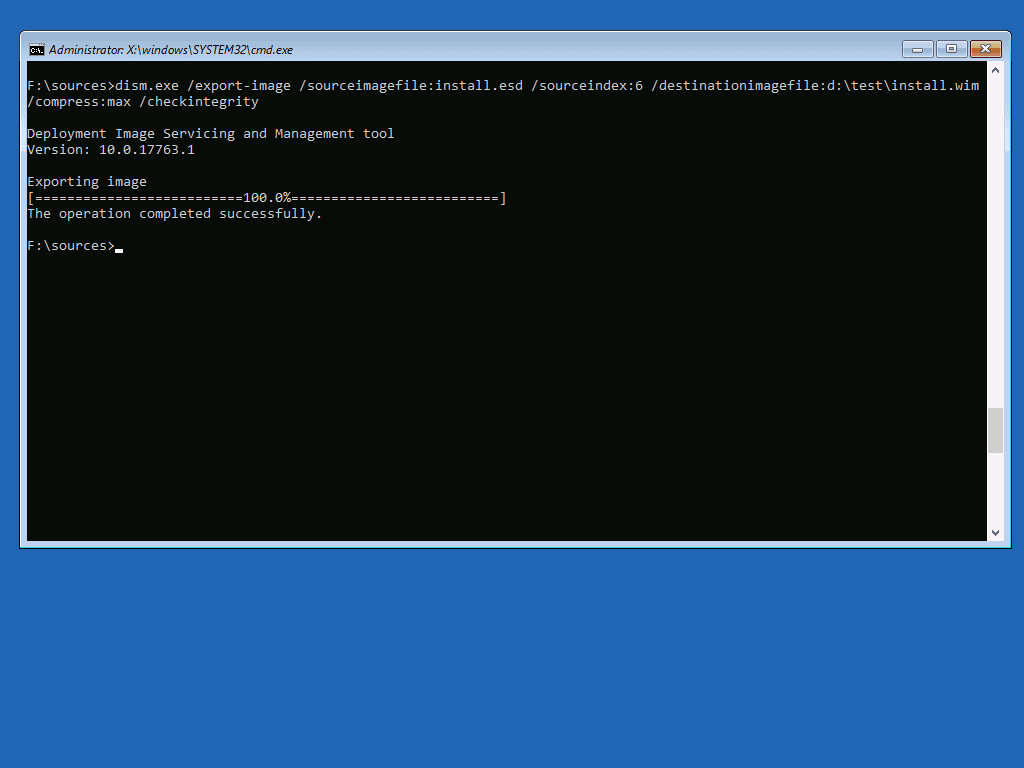
Now it is time to extract Install.WIM to d:test folder. To do this, run the command below:
When the command completes, proceed to the next step.
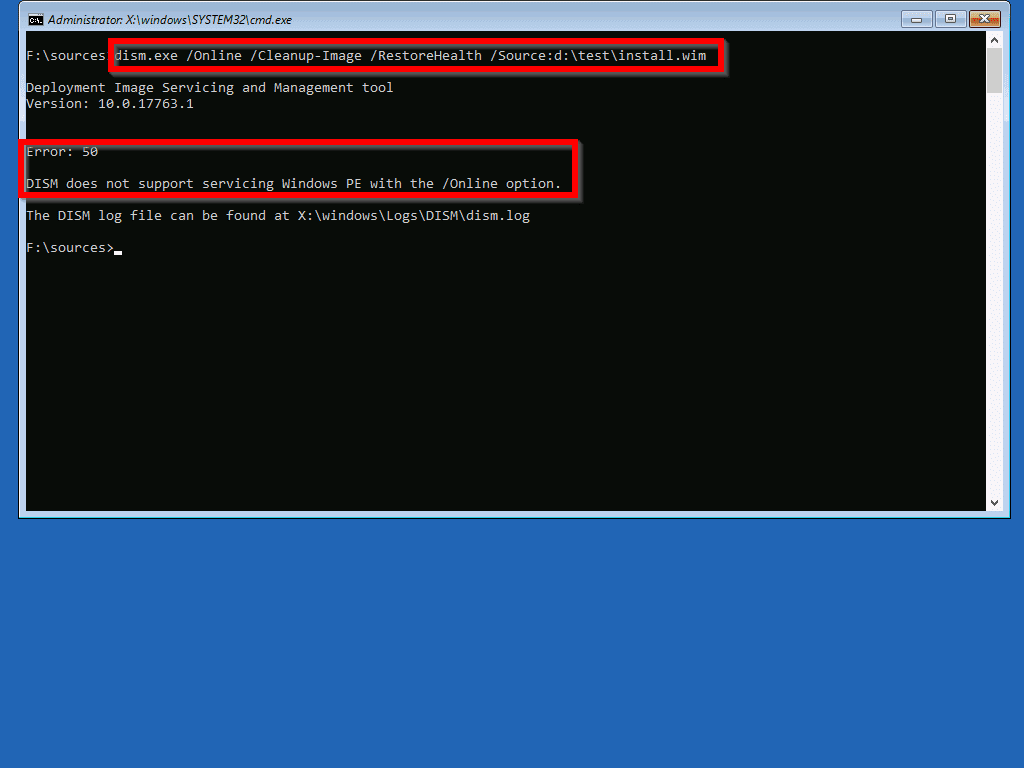
Finally, to repair windows 10 using intall.wim, run the command below:
When I ran the command it returned error 50: DISM does not support servicing Windows PE with the /Online option. If you receive this error message, find the resolution below this image.
Как исправить ошибку DISM 50 в Windows 10?
- Удалить связанный ключ реестра
- Сбросить BIOS
- Обновите программное обеспечение DISM
1. Удалите связанный ключ реестра
Когда появляется ошибка 50, это означает, что Windows Вы думаете, что расположение, из которого вы запускаете команду, находится внутри Win PE (среда предустановки), и это происходит из-за неуместного раздела реестра. Поэтому, чтобы исправить эту ошибку, вам нужно удалить этот ключ, выполнив следующие действия:
- нажмите Win + R клавиши клавиатуры, чтобы открыть окно «Выполнить».
- Там введите Regedit и нажмите Enter.
- В редакторе реестра вы найдете запись HKEY_LOCAL_MACHINE, и она развернется, просто нажмите на нее.
- Из нового списка, который будет отображаться, разверните HKEY_LOCAL_MACHINE SYSTEM Элемент управления CurrentControlSet,
- Под полем управления должна быть папка с именем MinInt,
- Щелкните правой кнопкой мыши на этой папке и выберите разрешений,
- Убедитесь, что там указано ваше имя пользователя, а также убедитесь, что Тотальный контроль Опция отмечена.
- Щелкните правой кнопкой мыши на MinInt папка снова и на этот раз выбрать удалить,
- Подтвердите изменения и перезапустите Windows 10 система.
Для очистки реестра вы также можете использовать специальный очиститель реестра.
Не можете получить доступ к редактору реестра? Пожалуйста, обратитесь к этому руководству, чтобы быстро решить проблему.
2. Сбросить BIOS
На вашем компьютере получите доступ к BIOS (доступ к BIOS зависит от производителя).
В BIOS найдите и получите доступ к записи параметров по умолчанию. В меню, которое будет отображаться на вашем компьютере, выберите сброс к заводским настройкам. Подтвердите изменения и перезагрузите устройство.
Это должно быть, и ошибка 50 DISM не поддерживает службу Windows PE с параметром / online теперь должно быть разрешено.
3. Обновите программное обеспечение DISM
- В вашем окне cmd (которое уже должно быть открыто после получения ошибки DISM 50) введите dism.exe / image: C: / cleanup-image / revertpendactions,
- Затем перезапустите безопасный режим на вашем Windows 10 система: нажмите Win + Rвведите MSConfig, переключитесь на автозагрузку и выберите безопасный режим.
- В безопасном режиме откройте окно с повышенными правами: нажмите Win + X и выберите Командная строка (администратор),
- В окне типа cmd SFC / Scannow и подождите, пока начнется сканирование; Это может занять некоторое время в зависимости от того, сколько файлов и программ хранится на вашем устройстве.
- Затем перезапустите Windows так что так и должно быть.
инсинуация– Если вы не можете выполнить описанные ниже шаги, попробуйте создать новый Windows рассчитывать, прежде чем начать это устранение неполадок.
DISM не удалось Windows 10? Вот еще одно прекрасное руководство для решения проблемы!
Там у вас есть это; это были решения по устранению неполадок для ошибки 50 DISM не поддерживает обслуживание Windows PE с опцией / онлайн сообщение об ошибке.
Вы также можете поделиться своим опытом с нами и нашими читателями, используя поле для комментариев ниже.
Часто задаваемые вопросы: узнайте больше об ошибках DISM
Обслуживание образов развертывания и управление ими – это инструмент командной строки, который можно использовать для обслуживания и подготовки Windows изображения, в том числе используемые для Windows ФИЗИЧЕСКОЕ ОБРАЗОВАНИЕ, Windows Восстановление среды (Windows RE) и Windows Приготовьте.
Ошибка DISM может быть связана с поврежденным файлом из источника автоматического восстановления. Чтобы это исправить, вам нужно загрузить изображение Windows 10 и укажите DISM на это.
От редактора Note: Этот пост был первоначально опубликован в октябре 2017 года и с тех пор был обновлен и обновлен в апреле 2020 года для его свежести, точности и полноты.
What does the System Update Readiness tool do
Verify the integrity of resources
The System Update Readiness tool verifies the integrity of the following resources:
- Files that are located in the following directories:
- %SYSTEMROOT%\Servicing\Packages
- %SYSTEMROOT%\WinSxS\Manifests
- Registry data that is located under the following registry subkeys:
- HKEY_LOCAL_MACHINE\Components
- HKEY_LOCAL_MACHINE\Schema
- HKEY_LOCAL_MACHINE\Software\Microsoft\Windows\CurrentVersion\Component Based Servicing
This list may be updated at any time.
When the System Update Readiness tool detects incorrect manifests, Cabinets, or registry data, it may replace the incorrect data with a corrected version.
Logging
The System Update Readiness tool creates a log file that captures any issues that the tool found or fixed. The log file is located here:
- %SYSTEMROOT%\Logs\CBS\CheckSUR.log
- %SYSTEMROOT%\Logs\CBS\CheckSUR.persist.log
/Export-Image
Exports a copy of the specified image to another file. The source and destination files must use the same compression type. You can also optimize an image by exporting to a new image file. When you modify an image, DISM stores additional resource files that increase the overall size of the image. Exporting the image will remove unnecessary resource files.
This command-line option does not apply to virtual hard disk (VHD) files.
Syntax:
| Parameter | Description |
|---|---|
| /SWMFile | Enables you to reference split .wim files. pattern is the naming pattern and location of split files. You can also specify wildcard characters. For example, «E:\image\install*.swm» will export the split files in the E:\image directory named install1.swm, install2.swm, and so on. |
| /Compress | Specifies the type of compression used for the initial capture operation. The /Compress argument does not apply when you export an image to an existing .wim file, you can only use this argument when you export an image to a new .wim file. The maximum option provides the best compression, but takes more time to capture the image. The fast option provides faster image compression, but the resulting files are larger than those compressed by using the maximum option. This is also the default compression type that is used if you do not specify the argument. Use the recovery option to export push-button reset images. The resulting files are much smaller in size, which in turn, greatly reduce the amount of disk space needed for saving the push-button reset image on a recovery drive. The destination file must be specified with an .esd extension. The none option does not compress the captured image at all. |
| /Bootable | Marks a volume image as being a bootable image. This argument is available only for WinPE images. Only one volume image can be marked as bootable in a .wim file. |
| /WIMBoot | Use /WIMBoot to append the image with Windows image file boot (WIMBoot) configuration. This only applies to Windows 8.1 images that have been captured or exported as a WIMBoot file. This feature isn’t supported in Windows 10. |
| /CheckIntegrity | Detects and tracks .wim file corruption when used with capture, unmount, export, and commit operations. /CheckIntegrity stops the operation if DISM detects that the .wim file is corrupted when used with apply and mount operations. |
Example:
Дополнительная информация
Если сообщение о том, что хранилище компонентов повреждено вы получаете при установке .NET Framework, а его восстановление описываемыми методами никак не влияет на ситуацию, попробуйте зайти в панель управления — программы и компоненты — включение или отключение компонентов Windows, отключить все компоненты .Net Framework, перезагрузить компьютер, а затем повторить установку.
При работе на операционной системе Windows 10, да и любой другой может случится всякое. Например, во время работы вы замечаете жуткие тормоза. Возникает мысль, что поработал вирус или вирусы. При проверке антивирусом, есть вероятность найти вирусы, а когда вы их очистите, то не факт, что произойдут какие-то изменения, так как они успели напортачить.
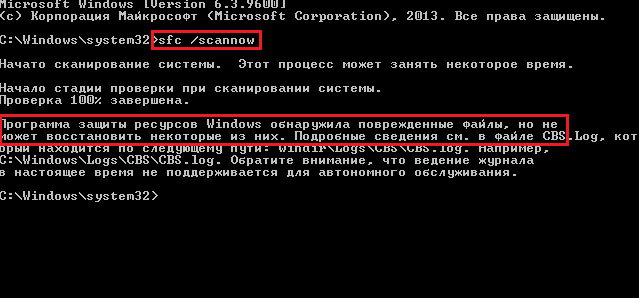
Итак, для проверки файлов Windows на целостность можно запустить утилиту sfc /scannow из командной строки и, если появится сообщение, что «программа защиты ресурсов Windows обнаружила повреждённые файлы, но не может восстановить некоторые из них», то эта статья поможет вам избавиться от этой ошибки. При наличии доступа в интернет, вы можете воспользоваться статьей: как восстановить повреждённое хранилище с помощью DISM.
При отсутствии интернета читаем далее эту статью.
Когда вы сканируете систему на целостность компонентов, то при обнаружении повреждённых файлов происходит их замена на рабочие из каталога WinSxS. Может быть данная папка удалена или файлы, находящиеся в ней, повреждены, тогда вы увидите сообщение, что «программа защиты ресурсов обнаружила поврежденные файлы…».